Hi Friends! I assume you’re here because you just purchased my preset (if you’re not sure why you’re here, I sell my Lightroom preset below) and are ready to start editing!
-
 Melissa Frusco Preset$20.00
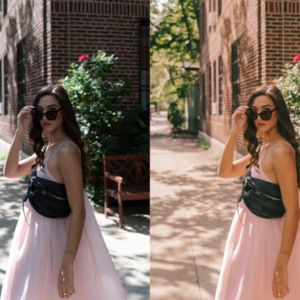
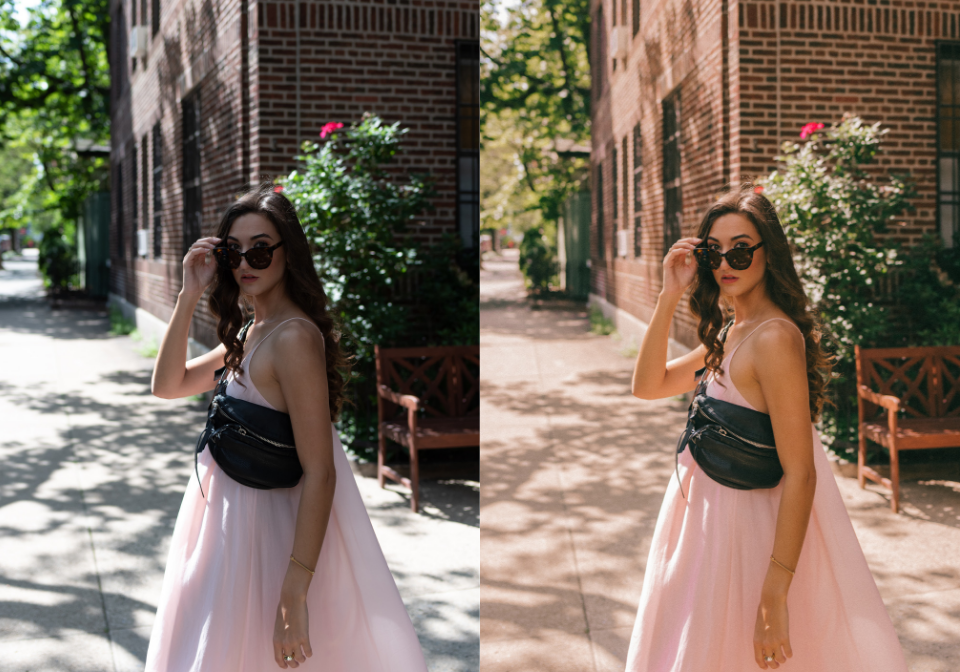
First off, THANK YOU! This preset is truly the only thing I use on all of my IG/blog photos and I couldn’t be more excited to share with you 🙂
Getting Started
To get started, download your new mobile & desktop preset directly from the purchase page or via the sale confirmation email.
If you’ve already downloaded and are looking for editing tip & how to get the most out of my preset, check out this post!
In the folder you will find:
- Melissa Frusco Preset – Desktop
- Melissa Frusco Preset – Mobile
- How to Guide & Editing Tips
** if you are unable to find the email containing these files, check your spam folder! If you’re still having issues, please email me directly at melissa.frusco@gmail.com **
After receiving your download, you must first unzip the file on a desktop computer, and then transfer your mobile preset file to your phone. You will not be able to unzip the file directly from your phone.
My preset pack includes a mobile and desktop version and can be used across the following Adobe Lightroom Programs:
- Lightroom Classic
- Lightroom CC (cloud based)
- Lightroom Mobile App (cloud based – syncs directly w/ Lightroom CC)
How to Install
Lightroom Desktop (Classic and CC)
Lightroom Classic
- Open Lightroom Classic on your computer
- Find your user presets under the “Develop” tab
- Click the (+) sign on the right and select “Import Presets…”
- This will open a new finder window. Search for “Melissa Frusco Preset” or look for it in your downloads. Select the file “Melissa Frusco Preset – Desktop.xmp”
- Restart Lightroom
- You’re ready to edit! My preset will be listed under “User Presets”
Lightroom CC (cloud based) *if you also use Lightroom Mobile, you do not need to install separately. The preset will sync automatically with the mobile app.*
- Open the Lightroom CC on desktop
- Enter editing mode and select ‘Presets’ on the bottom of the right side editing panel
- Your existing presets will open, select the three dots (…) in the top right corner and click ‘Import Presets…’
- This will open a finder tab and simply search Melissa Frusco – Desktop or find the ‘Melissa Frusco – Desktop.xmp‘ in your recent downloads (it will be the only option you can select in the preset folder).
- This will install the preset on Lightroom CC and sync with your Lightroom Mobile app.
- You’re ready to edit with Melissa Frusco Preset! Go to the photo you’d like to edit, click ‘Presets’ and select the preset you just saved!
Lightroom Mobile App
- Open the Melissa Frusco Preset folder on your computer
- Transfer ‘Melissa Frusco Preset – Mobile.dng‘ photo file to your phone (iPhone users, Airdrop is the best way to do this!) and save the photo to your camera roll
- Open the Lightroom Mobile App
- Import the photo into the app (it will say DNG on the top of the photo) as you would any photo you wish to edit
- Click the photo to open
- Check the photo Profile. you can find this at the top of your editing tabs. This preset looks best with the Adobe Standard profile. If the photo does not default to Adobe Standard, you change this by hitting “Browse” in the profile box and selecting Adobe Standard.
- Click the three dots (…) at the top right
- Click “Create Preset”
- Title the preset or leave it as is
- Edit the preset however you’d like, but I’d suggest leaving the below checked:
- Profile: Adobe Standard
- Light
- Color
- Effects
- Detail
- Optics
- Click save!
- You’re ready to edit with Melissa Frusco Preset! Go to the photo you’d like to edit, scroll right to “Presets” and select the preset you just saved!
If you’ve followed these steps and are still having issues, email me at melissa.frusco@gmail.com or DM me on IG @melissa.frusco.
As a general note, this preset is based off of Adobe Standard profile (you can change this under the editing tab on both mobile and desktop). This will give you the most true-tone that the preset was created for. Adobe Color profile will give you a more saturated photo.
Now that you’ve got the preset installed, play around with it! You can find my editing tips & how to get the most out of the Melissa Frusco preset here!
